

Last week, I talked about upping the ante on your Rosh Hashanah desserts with the Best Year Yet Carrot Cake with Honey Cream Cheese Frosting. This week I’m doing just the opposite. This apple pie is one of the easiest desserts I’ve ever made (unless you count fresh, uncut fruit topped with Cool Whip, of course).
It’s beautiful in its simplicity, and the ingredients are exceedingly easy to come by (you probably have all of them at home). No pie tin, no fussing, just pie crust with spiced apples formed into an easy, open-faced pastry treat.

Apples are finally in abundance, so all that’s left is the pie crust.
Most people I know who like to bake seem to have a pie crust recipe that they know and love, that possibly came from their mom, or even their Bubbe. I don’t. For all the time I spend baking, rarely do I make a pie — I tend to focus on brownies and breads. So, being without a go-to crust recipe, I called my mother to get hers. I inherited my love of baking from her, but not her pie crust recipe, which held oh-so-many delicious fillings when I was growing up. She was sure to have one.


And then the shocker came: “Oh, I just use Pillsbury pie crust — the stuff you find in the refrigerated section. I haven’t made pie crust from scratch in years.” (I know you don’t know my mom, but imagine the word “years” taking a full 2.5 seconds to be fully sounded. Yeah — that much emphasis.)

So there you have it: the pie crust I think of when I think of “mom’s apple pie” is from a red cardboard box that you can find squished between blocks of Colby Jack and break-n-bake cookies. You now have my permission to use store-bought pie crust. Hey — at least it’s (potentially) local, since Pillsbury is a General Mills brand, which is HQ’d in Minnesota. Should this be your course of action, feel free to skip down to step 8 of the recipe, no hard feelings.
But I wanted to offer you more than a product recommendation. I also didn’t want to start my new year off taking (for me) the easy route.
I wanted to know that I could make a delicious pie crust that could, someday, be one of my go-to recipes. So, I consulted my favorite foodie resources, all of which spoke the same gospel I’ll preach to you: pie crust is not hard, and it is totally worth the extra couple of steps. The recipes all say pretty much the same thing. Mix dry ingredients, cut in the coldest butter you can get, mix some ice water to combine, chill, then roll thin.
 So how do you work it so the pesky chilling time (which is essential for optimum flaky deliciousness) doesn’t mean you’re spending hours in the kitchen? Make the pie crust first, stick it in the fridge, then prep the rest while the dough is chilling and the oven is preheating. While your dough would ideally chill for 30-60 minutes, whatever you can get it in there for is better than nothing. Another bonus is that pie dough can be made ahead of time and refrigerated (or frozen, as long as you remember to take it out in time to be pliable enough to use).
And fancy equipment? Nope. As much as I love a good marble rolling pin or well-made springform pan, you’re fine without them — maybe better. Because this treat is better with its imperfections and unfanciness.

This treat screams love — like warm-hugs-from-your-mom-when-you-came-home-from-elementary-school love. Love that accepts you in sweatpants — in public. It says “I don’t need to impress you, I know you love me already (with or without this pie).” And that’s the way I want to start my new year — with some unconditional love. And pie.
Unconditional Love Apple Pie
Pie crust inspired by Smitten Kitchen
Pie filling inspired by my Mom
Serves: 6
Crust Ingredients:
A cup of ice water (you need at least 1/2 C)
1 C unbleached all-purpose flour, plus extra for dusting.
1 tsp sugar
1/8 tsp salt
6 Tbsp (3 oz, or 3/4 stick) cold, unsalted butter, chilled, cut into 1/2–inch pieces
Filling Ingredients:
2 baking apples (Granny Smiths are a good standby), sliced somewhat thinly (no need to get crazy — in fact, leave the skin on if you want)
1/2 tsp cinnamon
1/2 tsp ground ginger
1/4 ground nutmeg
1 Tbsp flour
1 Tbsp sugar
Directions, from start to finish:
- Get your butter as cold as possible, even if this means sticking it in the freezer ahead of time.
- Get a glass of water and put in an ice cube or two.
- In a large mixing bowl, combine the dry ingredients for the dough.
- Take the butter out and quickly cut it (but not your fingers!) with the sharpest knife you’ve got (hey, you froze it — it’s bound to be a little tough to cut).
- Cut in the butter with the dry ingredients. I like to use a fork, but (speaking of special equipment) a pastry blender will do if you’re so inclined, as will pulsing it in a food processor. Honestly, you should just use the fork — at least you know you’ve got one! In case you don’t know what “cutting in” is, you’re essentially making flour-coated chunks of butter. When it bakes, the fat (and flavor) in the butter will be absorbed by the flour (and become tasty morsels), and the water content of the butter will bake off, leaving pockets of air that create the flakiness. So: don’t mash too much, otherwise you’ll mash yourself right out of a light and flaky crust. It’s the holidays — don’t work so hard!
-
Drizzle 4 Tbsp of ice water one Tbsp at a time. Use a rubber scraper to pull the mixture together and knead it *gently,* just until it comes together. (The more you work it, the less butter will be available to create those lovely little pockets.)
-
Wrap the dough in plastic wrap and stick it in the fridge.
- Preheat the oven to 400 F.
- In a medium bowl, combine the filling ingredients.
- Core and cut your apples. If you feel like peeling them, go ahead — the dough will thank you.
- Toss the apples in the dry filling ingredients to coat.
- Line a baking sheet with parchment (or wax) paper.
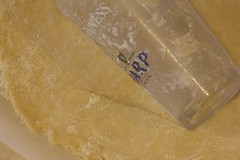
- Take the dough out of the fridge and unwrap it. Using a pint glass (or something similar), roll it about 1/8th of an inch thick into a rough circle. Dust the glass and/or the dough with flour if it sticks.
- Pile the apple mixture in the middle of the circle, leaving 1 1/2″-2″ of dough around the edges.
- Gently fold a piece of the edge up over the apples. Rotate it, folding as you go so the crust overlaps itself. Press firmly enough that the dough sticks to itself. This will keep the juices from leaking out.
- Brush the edges with melted butter or egg whites. Sprinkle sugar (Turbinado, if you’ve got it) over the top of the fruit and glazed crust.
- Bake in the lower-third to middle of the oven for 40-50 minutes, until the edges are nicely golden brown.
- Cool 10-15 minutes on the sheet, then move to a cooling rack.
- Serve as soon as it’s cool enough, or room temperature. Ice cream can only help, but a drizzle of honey would also be an appropriate topping.
