

The “Challatashen”
Every Shabbat my house smells the same, absolutely amazing. I started baking challah for Shabbat a couple of years ago as my personal Rosh Hashanah challenge. It is one of the best decisions I’ve ever made. I love how making challah for Shabbat is a tangible experience for my children, and hopefully the smell of warm bread in the oven will remind them of Shabbat with their family for decades to come.
You do not need to be a baker to make delicious challah. It really is not as complicated as some would have you believe. I understand some people, you know who you are, would like to “cheat.” But I ask you, is challah made from cheating filled with love? Love the most important ingredient of all!
Just give it a shot and have some fun with it! It’s easy enough to run to the store and pick up a perfectly delicious challah, true. But what if it’s Purim? Can you run to the store and pick up a Challatashen? Making challah at home lets you get creative and turn the experience into whatever you want it to be.
Baking challah for Shabbat has been a much more powerful experience than I had imagined it would be when I started a number of years ago. It’s all part of the grand thing called tradition that continues to bind and link us Jews together. And who doesn’t like hot fresh from the oven bread?


I encourage you to give it a shot. Get covered in flour, marvel at the wonder that is yeast, and give your family a challah that was lovingly prepared by you. Try this one. If you don’t care for it try another recipe, but keep trying. As I have discovered, challot are like snowflakes, no two turn out the same. Happy baking!
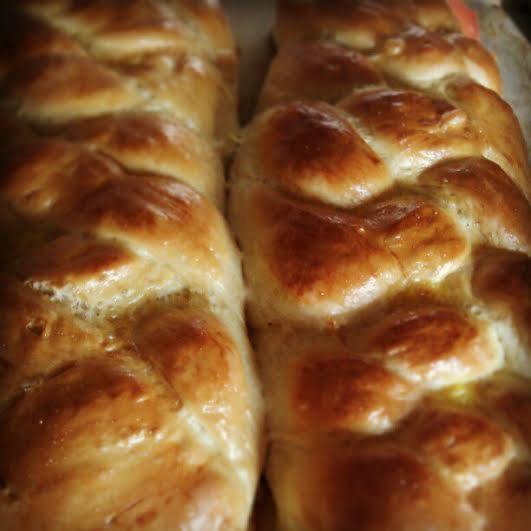
Challah (Egg Bread)
 Time: about 1 hour, plus 2 1/2 hours rising
Yield: 2 loaves
3 3/4 teaspoons active dry yeast
1 tablespoon of honey plus another 2 tablespoons to be added later
1 3/4 cups lukewarm water
1/2 cup olive or vegetable oil, plus more for greasing the bowl
5 large eggs
1 tablespoon table salt
8 to 8 1/2 cups all-purpose flour
Optional additions …
If you enjoy raisins in your bread try 1/2 cup raisins per challah, plumped in hot water and drained
Also, you may want poppy or sesame seeds for sprinkling.
1. In a large bowl, dissolve yeast and 1 tablespoon of honey in water; set aside for 5 minutes until a bit foamy. Do not skip this step, I have found out blooming the yeast before adding the other ingredients is actually important.
2. Whisk oil into yeast mixture, beat in 4 eggs, one at a time, with remaining honey and salt. If you like a sweeter Challah, add more honey, I like more savory bread so 3 tablespoons total is enough for me. Gradually add flour, one cup at a time. When dough holds together, it is ready for kneading. I use my Kitchen-aid with the dough hook and it works well; though struggles a bit near the final cup of flour.
3. Turn dough onto a floured surface and knead until smooth. Spray your bowl with non-stick cooking spray or grease it and return your dough to the bowl. Cover, and let rise in a warm place for 1 hour, until almost doubled in size. Dough may also rise in an oven that has been warmed to 150 degrees then turned off. Punch down dough, cover and let rise again in a warm place for another half-hour.
4. At this point, you can knead the raisins into the challah, if you’re using them, before forming the loaves. There are a number of youtube videos showing really amazing ways to braid Challah. If you’re a novice at Challah making I recommend making 2 loaves of the traditional 3 strand braided bread. Place braided loaves on a greased cookie sheet with at least 2 inches in between.


5. For a hard shell on your Challah, beat the remaining egg and brush it on loaves. You can freeze the bread or let rise another hour. For softer bread, wait until the final rising is complete and then brush loaves with egg just before placing into the oven.
6. If baking immediately, preheat oven to 375 degrees and for that hard shell brush the loaves with egg one last time. Sprinkle bread with seeds, if you choose to do so. If freezing, be sure to remove from freezer 5 hours before baking.
7. Bake in middle of oven for 30 to 40 minutes, or until golden. (If you have an instant read thermometer, you can take it out when it hits an internal temperature of 190 degrees.) Cool loaves on a rack.
Note: Any of the three risings can be done in the fridge for a few hours, for more deeply-developed flavor. When you’re ready to work with it again, bring it back to room temperature before moving to the next step.
Melissa spends her days in light saber battles with little boys dressed as Superman, Spiderman, and the Hulk. When she isn’t fighting for interstellar domination it’s usually because the children are sleeping.